

I have a story to go along with this post. If you don't want to read it, skip to the tutorial below.
I have been wearing my Green Covered Button Earrings lately...I like them. The day before we had our taxes done, I finally put together everything for taxes...yes, I had a year to get this stuff done and I did it in one afternoon and evening. I pulled out some file folders from our desk (you can see it the background here), and there were spider webs along one side of the file folders. These are not just any spider webs...they are black widow webs. Last summer a black widow, or two, or three, or four...invaded the desk and proceeded to have its children all over the desk...(this give me the chills just writing it). We took care of the beasties, but there were still webs left in and around the drawers. I mentioned something to Hubby about cleaning up the black widow webs and continued pulling the webs off of the files, making sure that there were no spiders. As I was doing this, something moved in my hair. I screamed, jumped up, proceeded to go crazy shaking my hair with my hand, asked Hubby to check my hair, he said "No Way, just shake your head some more." I walked back to where I was working and saw my new Green Covered Button Earring on the floor...The spider was my earring. I freaked for nothing.
Me to Hubby, "I can't believe you wouldn't check my hair."
Him, "Why?"
Me, "What if that thing bit my head?"
Him "What if a rattlesnake was in my sleeping bag, would you pull it out?"
Me, "I don't even think that compares, but I would at least try to beat it to death."
Apparantly, when it comes to black widows, my safety DOES NOT come first. Spider chivalry is dead in my house.
Here is how you can make your own Covered Button Earrings. Enjoy!
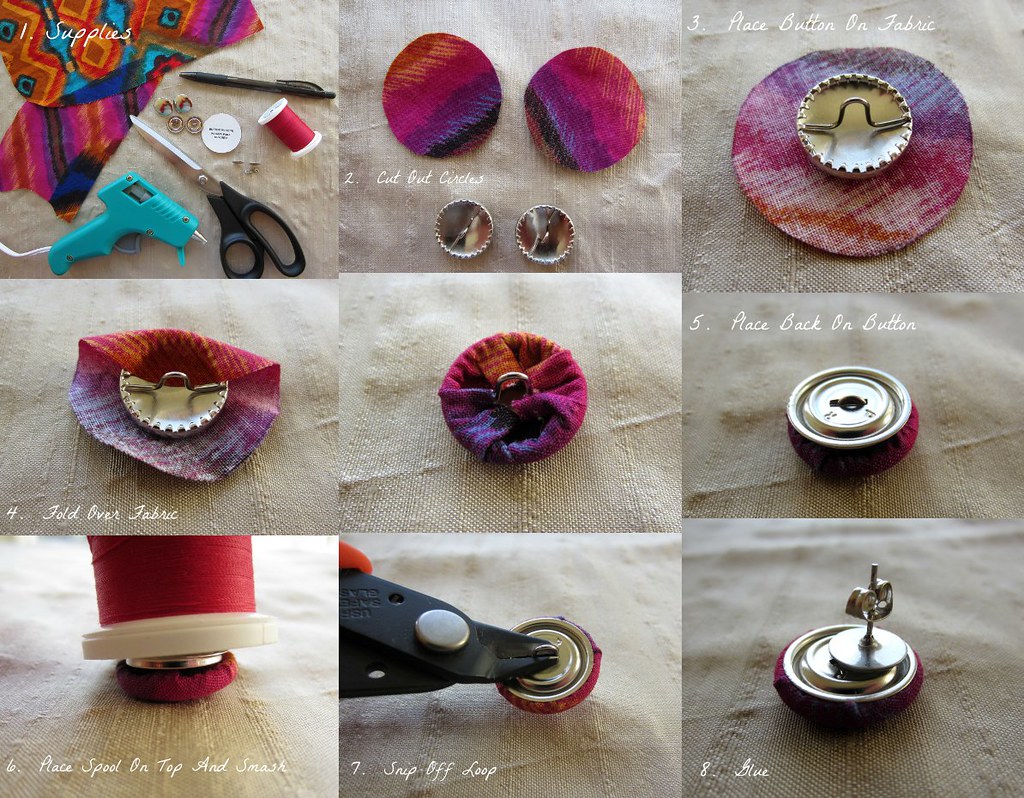
1. Supplies: Buttons (like these), 2" diamater circle template (usually on the back of the button package), Fabric Scraps, Pen, Scissors, Wire snips (not shown in the supplies photo), Hot glue gun (with a glue stick), and Earring posts and backs. 2. With your circle template, trace out on the fabric and cut the fabric into two circles. 3. Place the button top "teeth up" on the back side of the fabric circle. 4. Fold the fabric over the teeth making sure that the fabric stays. Work this well so that you don't end up with corners on your earrings. 5. Place the back on the button. 6. Use a spool of thread to smash the button back onto the button front. 7. Snip of the loop. If you snip off one side, then you should be able to pull the other side out. Or just cut both sides. 8. Glue on the earring post.

I bought the earring posts and backs at Joann's. Here is my review...they kind of stink. The reason my earring fell off was because the back slipped off. Make sure to buy earrings and backs that are some what tight. This may be difficult since the pieces are normally in a package, but you can buy loose pieces at a bead store so you can test them. Or, just take your chances...it's not like you are breaking the bank with these earrings.
beautiful post and tutorial.
ReplyDeleteThanks.
DeleteWhat a great idea. I have covered a lot of buttons over the years but never thought to create beautiful earings from them. Gorgeous and beautifully created. Your boxes turned out wonderfully...great idea. I especially loved seeing the cat eyeing a new place to hide out...so funny. Thanks for sharing. I am now a follower of your blog and look forward to return visits. I invite you to join me as well on my blog at http://atastefultouch.blogspot.com
ReplyDeleteHugs, Gayle.
Thank you Gayle! I will check out your blog. Thanks for the invite.
DeleteFYI the wires that you are cutting off with wire cutters, actually can be removed with your fingers. Just pinch the soft wire and pull out. Honest
ReplyDelete